Master CorelDraw Mesh Fill Tool Today
Unleash your creativity with CorelDraw powerful mesh fill tool. This comprehensive tutorial guides beginners and experts alike through the process of creating stunning illustrations with realistic shading and gradients. Elevate your designs and transform your art into captivating visuals!
CORELDRAW TUTORIAL
2 min read
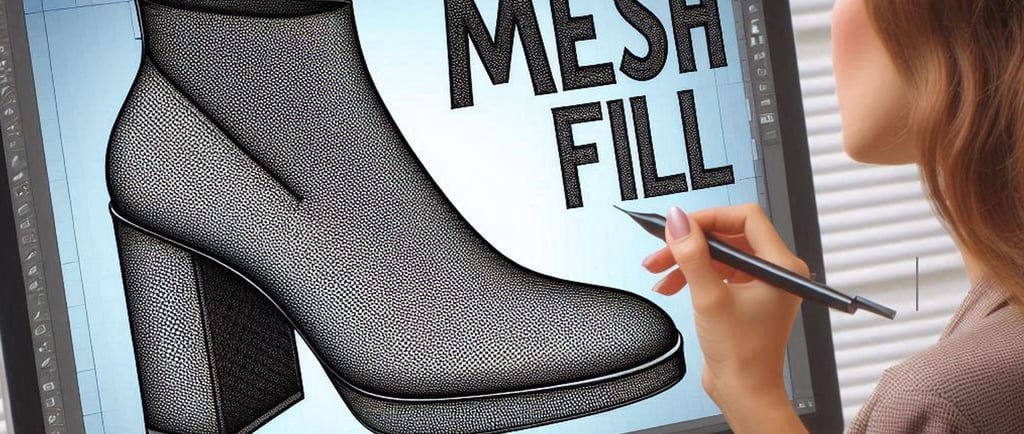
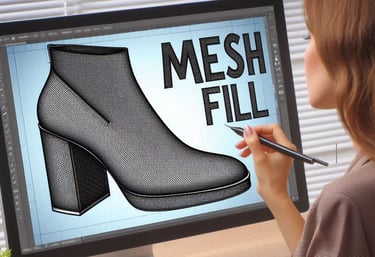
Unleash your creativity with CorelDraw. Discover the power of the Mesh Fill tool in CorelDraw, designed to bring your illustrations to life with stunning, realistic shading and gradients. Whether you're a professional designer or a hobbyist, the Mesh Fill tool offers precise control and endless possibilities, allowing you to create intricate designs with ease. Say goodbye to flat, lifeless images and elevate your art to new heights. Transform your vision into reality!
How to Use CorelDraw Mesh Fill Tool
Here's a step-by-step detailed guide on how to use the Mesh Fill Tool in CorelDraw. Following these steps anyone can create a stunning master piece. We also have a video at the end, that explains the whole processes step by step.
How to Use the Mesh Fill Tool in CorelDraw
Step 1: Open CorelDraw
Launch CorelDraw: Download CorelDraw and install on your Computer. Start CorelDraw on your computer.
Create a New Document: In CorelDraw, Go to File > New to open a blank canvas.
Step 2: Create Your Shape
Draw a Shape: Use any shape tool (e.g., Rectangle, Ellipse, or the Freehand tool in CorelDraw) to draw the shape you want to fill. For example, you can draw a simple rectangle or the outline of a shoe.
Step 3: Select the Mesh Fill Tool
Locate the Mesh Fill Tool: In the CorelDraw toolbox on the left side of the screen, find and select the Mesh Fill Tool. It looks like a grid or mesh icon.
Activate Mesh Fill Tool: Click on the CorelDraw Mesh Fill tool. Your shape will now display a grid.
Step 4: Adjust the Mesh Grid
Define Grid Lines in Mesh Fill: Click on your shape you made in CorelDraw, to define the number of horizontal and vertical lines. You can add more lines by clicking on the edges of the shape and dragging to create additional lines.
Adjust Grid Points in the Mesh: Click and drag on the grid points in CorelDraw, to adjust their positions. This allows you to control the shape and flow of the mesh within your object.
Step 5: Apply Colors to the Mesh
Select a Grid Point or Segment in Mesh Fill: In CorelDraw, Click on a specific grid point or segment to select it. The selected point or segment will be highlighted.
Apply Color: Choose a color from the color palette on the right side of the screen in CorelDraw. Click on the desired color to apply it to the selected grid point or segment.
Blend Colors: Continue selecting different grid points and applying colors to create smooth gradients and realistic shading. You can blend multiple colors to achieve the desired effect in CorelDraw.
Step 6: Fine-Tune Your Mesh Fill
Refine Adjustments: Adjust the positions of the grid points and segments to refine the transitions between colors. This helps in creating more natural and intricate designs in CorelDraw.
Experiment with Colors: Don't hesitate to experiment with different color combinations to see what works best for your design.
Step 7: Finalize Your Design
Review Your Work: Take a step back and review your mesh fill to ensure it looks as intended.
Save Your Design: Once satisfied, go to File > Save As in in CorelDraw, to save your design.
And there you have it! You've successfully used the Mesh Fill Tool in CorelDraw to create a detailed and colorful design. Happy designing! 🎨✨
Watch this CorelDraw Video Tutorial on how to Mesh Fill Tool in CorelDraw.
