Understanding Shutter Speed in Photography
Discover what Shutter Speed is in Photography and how it impacts your images. Learn how Shutter Speed settings control exposure time and influence your photography results.
PHOTOGRAPHY
4 min read
Transform your Photography with Corel AfterShot Pro - Try_it_30_days Free Experience unparalleled RAW photo editing, lightning-fast camera shutter speed, and superior image quality. Unlock the true potential of your Photography, from stunning landscapes to vibrant portraits. Achieve professional results with ease and elevate your photography game. Get Corel AfterShot Pro today!
What is Shutter Speed in Photography?
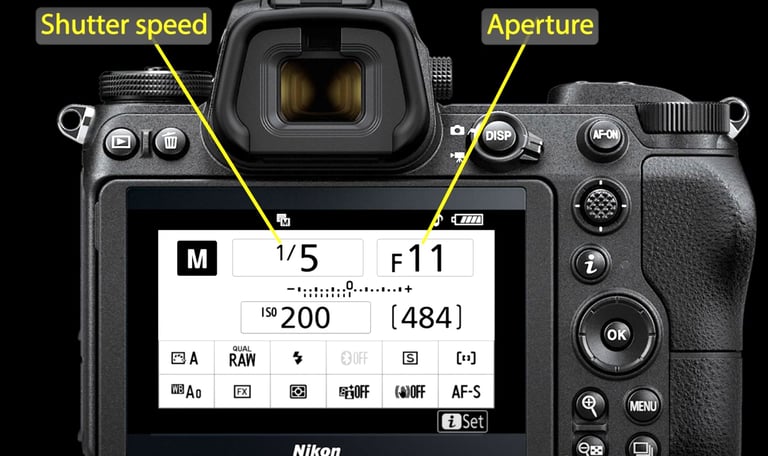
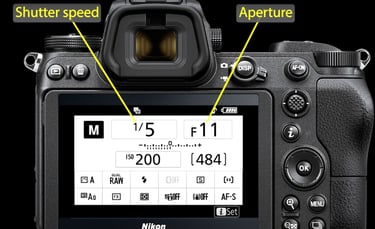
Shutter speed is a key setting in photography that determines how long the camera's shutter remains open to expose the camera sensor to light. Shutter speed is a fundamental concept in photography that affects how your photos look. Shutter speed refers to the amount of time the camera's shutter remains open to allow light to hit the camera sensor. It is measured in seconds or fractions of a second (e.g., 1/1000, 1/500, 1/250).
How Shutter Speed Works
When you press the shutter button on your camera, the shutter opens for a certain amount of time, exposing the sensor to light. After the set duration, the shutter closes, and the camera captures the image.
Effects of Shutter Speed
Exposure:
Fast Shutter Speed (e.g., 1/1000, 1/500): The shutter is open for a very short time, allowing less light to enter. This results in a darker image.
Slow Shutter Speed (e.g., 1/30, 1/15): The shutter is open for a longer time, allowing more light to enter. This results in a brighter image.
Motion Blur:
Fast Shutter Speed: Freezes motion, capturing sharp and clear images of moving subjects. Ideal for sports, wildlife, or action photography.
Slow Shutter Speed: Creates motion blur, where moving objects appear blurred. This can be used creatively to show movement, like flowing water or light trails.
Choosing the Right Shutter Speed
Fast Shutter Speed: Use this when you want to freeze fast-moving subjects, like running athletes, animals, or moving vehicles.
Slow Shutter Speed: Use this for creative effects, like capturing light trails, star trails, or smooth water in landscapes.
Practical Tips on Shutter Speed
Use a Tripod: When using slow shutter speeds, a tripod helps prevent camera shake and ensures sharp images.
Experiment: Try different shutter speeds to see how they affect your images. Practice will help you understand the relationship between shutter speed, exposure, and motion blur.
Check Settings: Most cameras have a "Shutter Priority" mode (usually denoted as "S" or "Tv"), allowing you to set the shutter speed while the camera adjusts other settings for proper exposure.
Tips & Tricks for Shutter Speed
Freeze Action with Fast Shutter Speeds:
Use fast shutter speeds (1/500 or faster) to capture sharp images of moving subjects like sports events, wildlife, or fast cars.
If your camera has a "Sports" mode, use it to automatically set a fast shutter speed.
Create Motion Blur with Slow Shutter Speeds:
Use slow shutter speeds (1/30 or slower) to create motion blur and show movement, like flowing water, light trails, or star trails.
A tripod is essential for keeping the camera steady and preventing unintended blurriness.
Use Shutter Priority Mode:
Most cameras have a "Shutter Priority" mode (denoted as "S" or "Tv"), allowing you to select the shutter speed while the camera adjusts the aperture and ISO for proper exposure.
This mode is great for experimenting with different shutter speeds without worrying about other settings.
Adjust ISO and Aperture:
When using slow shutter speeds in low light, increase the ISO to maintain a proper exposure.
Use a wider aperture (lower f-number) to allow more light in when using fast shutter speeds.
Experiment with Different Shutter Speeds:
Try different shutter speeds to see how they affect your images. Practice capturing moving subjects at various speeds to understand how they impact motion blur.
Experiment with panning (moving the camera along with a moving subject) using a slow shutter speed to create a sharp subject against a blurred background.
Use Filters for Creative Effects:
Neutral Density (ND) filters reduce the amount of light entering the camera, allowing you to use slower shutter speeds even in bright conditions. This is perfect for capturing smooth water or creating a dreamy effect in daytime photography.
Avoid Camera Shake:
For slow shutter speeds, use a remote shutter release or the camera's self-timer to avoid camera shake when pressing the shutter button.
Utilize image stabilization features if your camera or lens has them.
Understand the "Reciprocal Rule":
To avoid blur from camera shake when hand-holding your camera, use a shutter speed that's at least the reciprocal of your focal length. For example, if shooting at 50mm, use a shutter speed of 1/50 or faster.
Bracketing:
Use exposure bracketing to take multiple shots at different shutter speeds, then choose the best one during post-processing.
Examples of Using Shutter Speed
1/1000: Ideal for capturing fast action, like a bird in flight.
1/60: Suitable for general photography with minimal motion blur.
1/2: Great for creative effects, like capturing the movement of a waterfall.
Understanding shutter speed is essential for mastering photography and creating stunning images that capture the essence of the moment. Happy shooting! 📸
Watch this video to understand Shutter Speed in Photography even better.

Corel AfterShot Pro Try it 30 Days Free. Corel AfterShot Pro offers advanced RAW photo editing, powerful highlight recovery, and efficient batch processing, making it perfect for photographers seeking professional results with an intuitive and flexible workflow. 📸
RAW Photo Editing: AfterShot Pro offers advanced RAW photo editing capabilities, allowing you to make precise adjustments to your images.
Highlight Recovery: Enhanced highlight recovery helps you bring out details in overexposed areas of your photos.
Blemish Remover: Easily remove imperfections and blemishes from your photos with the built-in blemish remover tool.
Batch Processing: Edit and perfect one or thousands of photos simultaneously with powerful batch processing controls.
Flexible File Management: Sort, organize, and view all your photos in one place without the need for importing.
Time-Saving Workflow: Speed through loading, selecting, editing, and output with an easy-to-use workflow.
Integration with Third-Party Software: Expand the functionality of AfterShot Pro using the Plugin Manager.
Preset Collections: Utilize in-built preset collections for auto editing, making it easier to achieve consistent results.
These features make Corel AfterShot Pro a versatile and efficient tool for both beginners and professional photographers. 📸te your text here...