Understanding Exposure in Photography
Master the fundamental skill of Exposure in Photography. Learn how Shutter Speed, Aperture, and ISO work together in the Exposure Triangle to create stunning images in both low light and bright conditions.
PHOTOGRAPHY
4 min read
Understanding Exposure in Photography
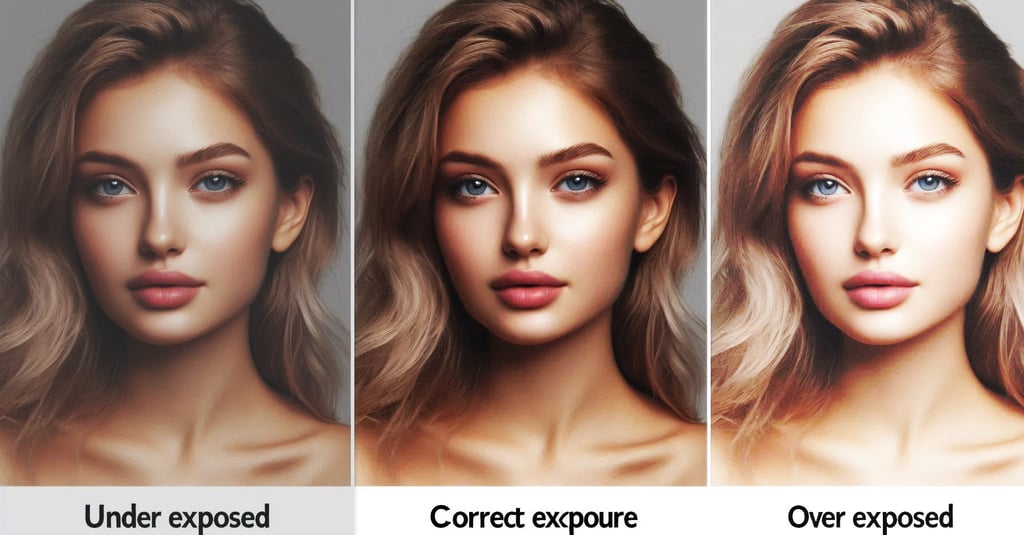
Understanding Exposure in Photography is a fundamental skill every photographer must master. Exposure determines how light or dark an image appears, affecting not only the aesthetic but also the clarity and detail captured in a photograph. Exposure is controlled by three main settings: Shutter Speed, Aperture, and ISO. These three settings are collectively known as the "Exposure Triangle." We'll explore how to set the correct exposure in both low light and bright light conditions, ensuring that your images stand out regardless of the environment.
Shutter Speed and Exposure
Shutter Speed refers to the amount of time the camera's shutter is open, allowing light to hit the camera sensor. It is measured in seconds or fractions of a second. For example, a shutter speed of 1/1000 means the shutter is open for one-thousandth of a second. Faster shutter speeds (e.g., 1/1000) are used to freeze motion, while slower shutter speeds (e.g., 1/10) can create motion blur.
Aperture and Exposure
Aperture is the size of the opening in the camera lens through which light enters. It is measured in f-stops (e.g., f/2.8, f/4, f/8). A lower f-stop number (e.g., f/2.8) indicates a wider aperture, allowing more light to enter the camera, resulting in a brighter image. Conversely, a higher f-stop number (e.g., f/16) indicates a narrower aperture, allowing less light to enter, resulting in a darker image. Aperture also affects the depth of field, with wider apertures creating a shallow depth of field (blurry background) and narrower apertures creating a deep depth of field (sharp background).
ISO and Exposure
ISO measures the sensitivity of the camera sensor to light. A lower ISO value (e.g., ISO 100) means lower sensitivity, resulting in less noise and a cleaner image. A higher ISO value (e.g., ISO 3200) means higher sensitivity, allowing you to shoot in low-light conditions but potentially introducing more noise (graininess) into the image.
Balancing the Exposure Triangle
Achieving the correct exposure involves balancing the three elements of the exposure triangle. For example, if you increase the shutter speed to freeze motion, you may need to widen the aperture or increase the ISO to maintain the same exposure level. Similarly, if you narrow the aperture for a greater depth of field, you may need to slow down the shutter speed or increase the ISO. Here's how you can balance these three settings:
Exposure Setting Starts with ISO: Set your ISO based on the lighting conditions. Use a low ISO in bright light and a higher ISO in low light.
Exposure Next Setting is Shutter Speed: Now set your Shutter Speed based on the motion in the scene. Use a fast shutter speed for fast-moving subjects or a slower shutter speed for still subjects or creative motion blur.
Set Aperture to Control Exposure: Choose your aperture based on the depth of field you want. Use a wide aperture (low f-number) for a blurry background or a narrow aperture (high f-number) for a sharp background.
Exposure Practical Examples
Exposure in Landscape Photography: Typically uses a narrow aperture (e.g., f/11) for a deep depth of field, a low ISO (e.g., ISO 100) for minimal noise, and a slower shutter speed to ensure proper Exposure.
Exposure in Portrait Photography: For better Exposure control in a Portrait photo, use a wide aperture (e.g., f/2.8) for a shallow depth of field, so that the background is blurred. This entails you to use a moderate ISO (e.g., ISO 400) to balance light sensitivity, and a faster shutter speed to avoid motion blur.
Exposure in Sports Photography: Sports photography requires a fast Shutter Speed (e.g., 1/1000) to freeze action, which will reduce the Exposure. So you will need to use a wide aperture (e.g., f/2.8) to allow more light, and a higher ISO (e.g., ISO 800) to compensate for the fast shutter speed.
Setting Exposure in Low Light Conditions
Capturing stunning photographs in low light can be challenging, but with the right exposure settings, it is achievable. The three critical components of exposure are aperture, shutter speed, and ISO. In dimly lit environments, consider opening your aperture wide to allow more light to enter the camera. This will help you capture more details and reduce noise, producing a cleaner image.
A slower shutter speed can also facilitate exposure in low light, but be cautious as it risks blurriness from camera shake. A tripod is beneficial in these scenarios. Lastly, increasing the ISO sensitivity of your camera allows you to capture images effectively without compromising exposure. However, excessive ISO can introduce noise into your images, so balance is key.
Optimizing Exposure in Bright Light Conditions
Conversely, bright light can present its own set of challenges. The primary goal in such conditions is to avoid overexposure, which can lead to loss of detail in the highlights. To manage exposure effectively, consider using a narrower aperture to restrict light entry while maintaining focus depth. This allows you to retain more detail in your images, even under bright sunlight.
Moreover, a faster shutter speed will help freeze fast movements, reducing the chances of overexposure. Reducing the ISO setting is another effective method to manage exposure in bright conditions since a lower ISO results in less sensitivity to light, maintaining the richness and detail of your shots.
Balancing Exposure for Optimal Results
Mastering Exposure in Photography requires practice and familiarity with your camera's settings. Whether shooting in low light or bright light conditions, understanding the interplay between Aperture, Shutter Speed, and ISO is essential for achieving the perfect exposure. Take the time to experiment and adapt these techniques to your unique style. With patience and practice, your ability to shoot in any lighting condition will greatly improve, allowing your photographs to capture the beauty of every moment. Mastering Exposure in Photography is essential for capturing well-lit and visually appealing images. By understanding and balancing shutter speed, aperture, and ISO, you can achieve the desired exposure and create stunning photographs.
World's Fastest RAW Photo Editor