Photo Color Correction in CorelDRAW
Discover CorelDRAW photo editor's Image Adjustment Lab feature for color correction or change colors of image. Enhance image tone with AI tools to adjust brightness, contrast, and saturation with real-time previews, perfect for ID cards, banners, and studio shots.
CORELDRAW TUTORIAL
7 min read
Photo Color Correction in CorelDRAW
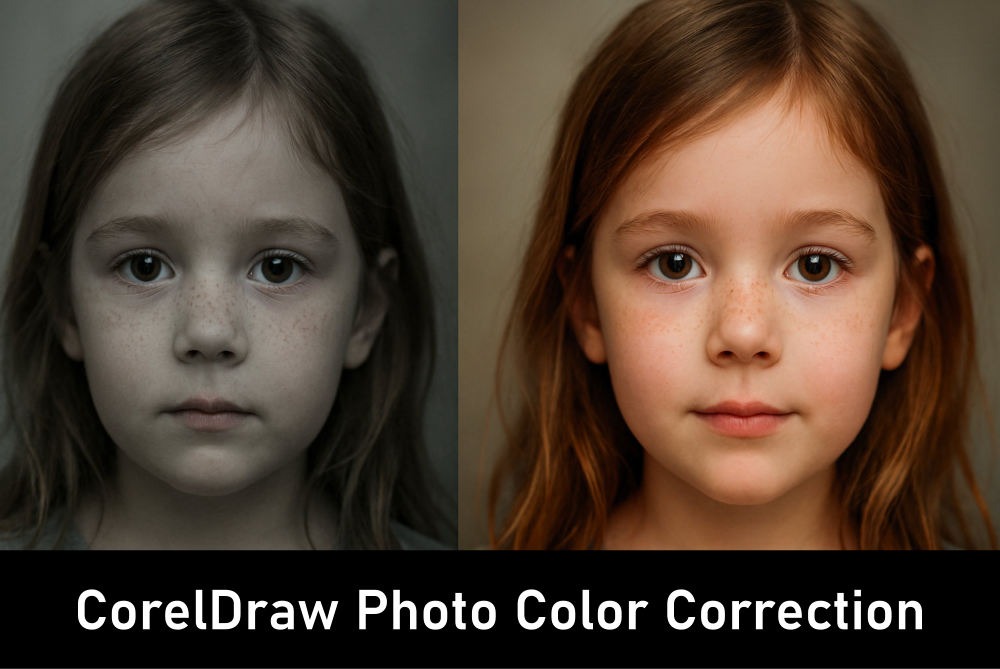
CorelDRAW Photo Color Correction, via the Image Adjustment Lab, offers a great tool to change colors of image, and tone. Users can adjust brightness, contrast, saturation, and white/black points with real-time previews. CorelDRAW streamlines photo editing for everything including ID cards, banners, and studio shots. Ideal for both beginners and professionals.

Introduction to Photo Color Correction
Photo color correction is the process of adjusting or change colors of image, tones, and brightness, to achieve a natural or desired look. Color correction ensures that photos appear realistic, balanced, and visually appealing. Color correction is essential when images suffer from poor lighting, incorrect white balance, or dull tones. By correcting colors, photographers and designers can restore vibrancy, highlight details, and create consistency across multiple images. In professional design, accurate change colors of image is very important for branding, marketing, and print production. CorelDRAW Image Adjustment Lab feature, that provides a streamlined environment to change colors of image, efficiently and effectively.
What is Image Adjustment Lab?
The Image Adjustment Lab in CorelDRAW is a dedicated workspace designed to simplify photo color correction tasks. It consolidates multiple adjustment tools into a single dialog, allowing users to modify brightness, contrast, hue, saturation, change colors of image, and balance them without switching between filters. The Image Adjustment Lab provides both automatic and manual controls, enabling quick fixes or precise adjustments. Features like snapshots, histograms, and preview modes help users evaluate changes before applying them. By working from top to bottom in the image adjustment Lab’s interface, users can systematically correct issues, ensuring professional-quality results. It is particularly useful for bitmap images imported into CorelDRAW projects.
Preparing Images for Correction
Before entering the Image Adjustment Lab for color correction, it is recommended to crop or retouch areas of the photo that are not needed. This ensures that corrections focus only on relevant portions of the image. Removing distractions or damaged areas helps maintain consistency in change colors of image and adjustments. Additionally, users should check the resolution and format of the image to avoid quality loss during editing. Preparing images for color correction also involves identifying the problems, such as underexposure, color casts, or lack of contrast, that need correction. By analyzing the photo beforehand, users can apply change colors of image and targeted adjustments in the Image Adjustment Lab, saving time and achieving better results.
Navigating the Image Adjustment Lab Interface
The Image Adjustment Lab in CorelDraw interface is organized logically, guiding users through color correction steps from top to bottom. At the top, tools for rotation, zoom, and panning allow users to position the image for editing. Below, options for selecting white and black points help establish tonal ranges. The histogram provides a visual representation of tonal distribution, aiding in precise adjustments. Sliders for brightness, contrast, hue, saturation, and color balance are arranged for easy access. Snapshot tools let users capture different versions of corrections for comparison. This structured interface ensures that even beginners can follow a systematic workflow for photo color correction.
Color Correction: Brightness
Brightness in color correction in CorelDraw adjusts the overall lightness or darkness of an image. In the Image Adjustment Lab, the brightness slider allows users to increase or decrease exposure levels. Increasing brightness can reveal hidden details in shadows, while decreasing it can prevent highlights from appearing washed out. The histogram helps monitor changes, ensuring balanced tonal distribution. Brightness correction is particularly useful for photos taken in dim lighting or overly bright conditions. By carefully adjusting brightness, users can restore natural illumination, making the photo more visually appealing. It is often the first step in color correction, setting the foundation for further change colors of image and other adjustments.
Color Correction: Adjusting Contrast
Contrast defines the difference between light and dark areas in an image. In the Image Adjustment Lab of CorelDraw, the contrast slider enhances or reduces this difference. Increasing contrast makes details sharper and colors more vivid, while decreasing it creates a softer, muted look. Proper contrast adjustment prevents images from appearing flat or overly harsh. The histogram is a valuable guide, showing how tonal ranges shift with contrast changes. By fine-tuning contrast, users can emphasize textures, improve depth, and create a dynamic change colors of image giving the image a definite visual impact. Balanced contrast ensures that both highlights and shadows contribute to the overall clarity of the photo.
Color Correction: Adjusting Hue
Hue refers to the actual color tone of an image. The CorelDraw Image Adjustment Lab provides a hue slider to shift colors across the spectrum. This tool is useful when you want to change colors of image that have an unwanted color casts, such as a yellow tint from indoor lighting or a blue cast from outdoor shadows. Adjusting hue restores natural color representation, ensuring accuracy in skin tones, landscapes, or product images. Subtle color correction can dramatically improve the realism of a photo. Designers often use hue correction to align images with brand colors or artistic themes. Careful adjustment prevents oversaturation or unnatural tones, maintaining visual harmony.
Color Correction: Adjust Saturation
Saturation change colors of image. CorelDraw Image Adjustment Lab has a saturation slider that increases or decreases color vividness. Boosting saturation makes colors more vibrant, ideal for enhancing landscapes or promotional materials. Reducing saturation creates a muted or monochromatic effect, useful for artistic styles or color correction of a overly vivid photo. The key is moderation, because excessive saturation can make images look unrealistic, while too little can make them dull. By balancing saturation, users can achieve natural yet striking visuals. Saturation adjustment is often combined with hue correction to refine overall color balance and achieve professional-quality results.
Color Correction: White Balance
White balance in color correction ensures that whites in an image appear neutral, without color casts. In the Image Adjustment Lab of CorelDraw, users can select white and black points to define tonal extremes. This color correction adjustment can fix color temperature issues, such as warm indoor lighting or cool outdoor shadows. Proper white balance restores natural color relationships, making photos look realistic. It is especially important in product photography, where accurate color representation is the most important aspect. By setting correct white and black points, users can eliminate unwanted tints and achieve balanced tones. White balance correction is a foundational step that influences all subsequent color adjustments.
Compare Color Correction Using Snapshots
Snapshots are a unique feature of the CorelDraw Image Adjustment Lab, allowing users to capture different versions of color correction. Each snapshot appears as a thumbnail below the image, enabling quick comparison between each change colors of image the users have done. This feature is invaluable for experimenting with multiple settings without losing progress. Users can test variations in brightness, contrast, hue, or saturation, then select the most effective combination of change colors of image. Snapshots also serve as a record of change colors of image which the users have done until then, helping users refine their workflow. By leveraging snapshots, designers can confidently explore creative options to change colors of image while ensuring they retain control over the final outcome of their photo corrections.
Color Correction: Fine-Tuning with Histograms
The histogram in the Image Adjustment Lab of CorelDraw visually represents tonal distribution across shadows, midtones, and highlights. It helps users identify areas of underexposure or overexposure. By monitoring the histogram while adjusting change colors of image like brightness, contrast, or color balance, users can achieve precise color corrections. A balanced histogram typically shows a smooth distribution without clipping at either end. Histograms are especially useful for professional designers who require technical accuracy in photo color correction. They provide objective feedback to change colors of image, ensuring that adjustments enhance rather than distort the image. Using histograms alongside sliders allows for fine-tuning corrections, resulting in polished, professional-quality photos suitable for print or digital use.
Color Correction: Shadows and Highlights
Shadows and highlights define the extremes of tonal range in a photo. The CorelDraw Image Adjustment Lab allows users to adjust these areas using black and white point selectors. Color correction of shadows ensures that dark areas retain detail, while adjusting highlights prevents bright areas from appearing washed out. Balancing shadows and highlights creates depth and realism in images. This step is particularly important in high-contrast scenes, such as outdoor photography with strong sunlight. By fine-tuning these extreme change colors of image, users can achieve a natural balance, ensuring that all parts of the photo contribute to its overall visual impact.
Color Correction: Balance Midtones
Midtones represent the middle range of brightness in an image. Adjusting midtones in the Image Adjustment Lab helps refine overall tonal balance. This step is important for portraits, where skin tones must appear natural and consistent. By carefully adjusting midtones whilst users change colors of image, they can enhance subtle details without affecting shadows or highlights. Midtone color correction often complements brightness and contrast adjustments, ensuring smooth transitions across tonal ranges. Balanced midtones contribute to a realistic and a visually pleasing photo. Designers use this change colors of image technique to maintain harmony in images, especially when preparing them for print, where tonal accuracy is important for professional results.
Color Correcton and Balance
Balance adjustments whilst a user change colors of image in the CorelDraw Image Adjustment Lab allow them to modify the relative intensity of red, green, and blue channels. This tool is essential for correcting color casts caused by lighting conditions. For example, reducing blue tones can correct overly cool images, while increasing red tones can warm up photos. Change colors of image with good balance ensures that all colors appear natural and consistent. It is particularly important in product photography, where accurate color representation influences consumer perception. By fine-tuning color balance, users can eliminate unwanted tints and achieve harmonious visuals. This adjustment complements hue and saturation color corrections for a complete color refinement.
Automatic vs. Manual Corrections
The Image Adjustment Lab in CorelDraw offers both automatic and manual correction options. Automatic tools provide quick fixes by analyzing the image and applying standard change colors of image adjustments. These are useful for beginners or when time is limited. Manual controls, on the other hand, allow precise customization of brightness, contrast, hue, saturation, change colors of image and balance. Professionals often prefer manual adjustments for greater control and accuracy in color correction. Combining both approaches can be effective, automatic corrections provide a baseline, while manual refinements tailor the image to specific needs. This flexibility makes the CorelDraw Image Adjustment Lab feature suitable for both casual users and professional designers.
Final Words on Color Correction in CorelDraw
Photo color correction using the Image Adjustment Lab in CorelDRAW is a powerful way to transform ordinary images into polished, professional visuals. By systematically adjusting brightness, contrast, hue, saturation, change colors of image and its balance, users can restore natural tones and eliminate unwanted casts. The image adjustment Lab’s user friendly interface, snapshots, and histogram tools make fine-tuning both accessible and precise. Whether correcting exposure issues or enhancing creative projects, this feature ensures consistency and accuracy across designs. Ultimately, mastering color correction in CorelDRAW empowers designers to produce vibrant, balanced images that captivate audiences and meet professional standards in both print and digital media.